Designing Parts That Are Easy to Assemble — And Why It's Costing You More Than You Think
Assembly labour is one of the biggest hidden cost drivers in SMEs. Poor part design slows builds, drives rework, and frustrates operators. DFMA fixes it at the source—your design. Here’s how bad design inflates costs, and a practical way to reduce them fast.

The Problem: Your Parts Were Designed to Function — Not to Assemble
Here's a pattern I see constantly in small and mid-sized manufacturing businesses across Australia.
The design engineer creates a product that works. It meets the functional spec. It looks good in SolidWorks. The drawings get released to the shop floor. And then the problems start.
The operator picks up a bracket and can't tell which way it goes. Two holes that should line up don't — not because they're out of tolerance, but because the parts need to be held, rotated, and shimmed before the fastener will go in. A sub-assembly requires three hands: one to hold the part, one to hold the fixture, and one to drive the screw. Nobody has three hands.
The result? Assembly takes twice as long as it should. Rework creeps up. Operators develop workarounds that aren't documented. And the business owner wonders why labour costs keep climbing even though headcount hasn't changed.
This isn't a labour problem. It's a design problem.
In my experience — across toolmaking, product design, R&D engineering, and production line setup — the root cause of most assembly inefficiency is that parts were designed for function, not for assembly. The two are not the same thing. A part can work perfectly and still be a nightmare to put together.
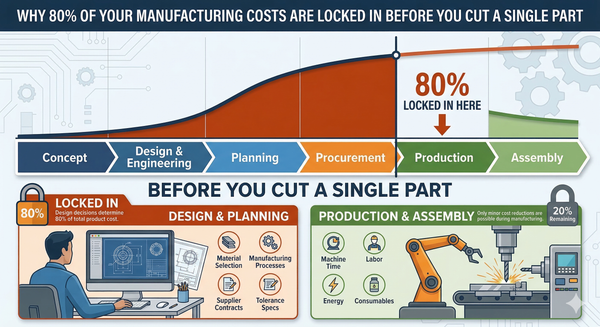
The Cost: What Poor Assembly Design Actually Costs You
Let's put some numbers to this. Assembly labour is typically 30–50% of total manufacturing cost in SME operations. When parts are poorly designed for assembly, you can expect to see impacts across several categories.
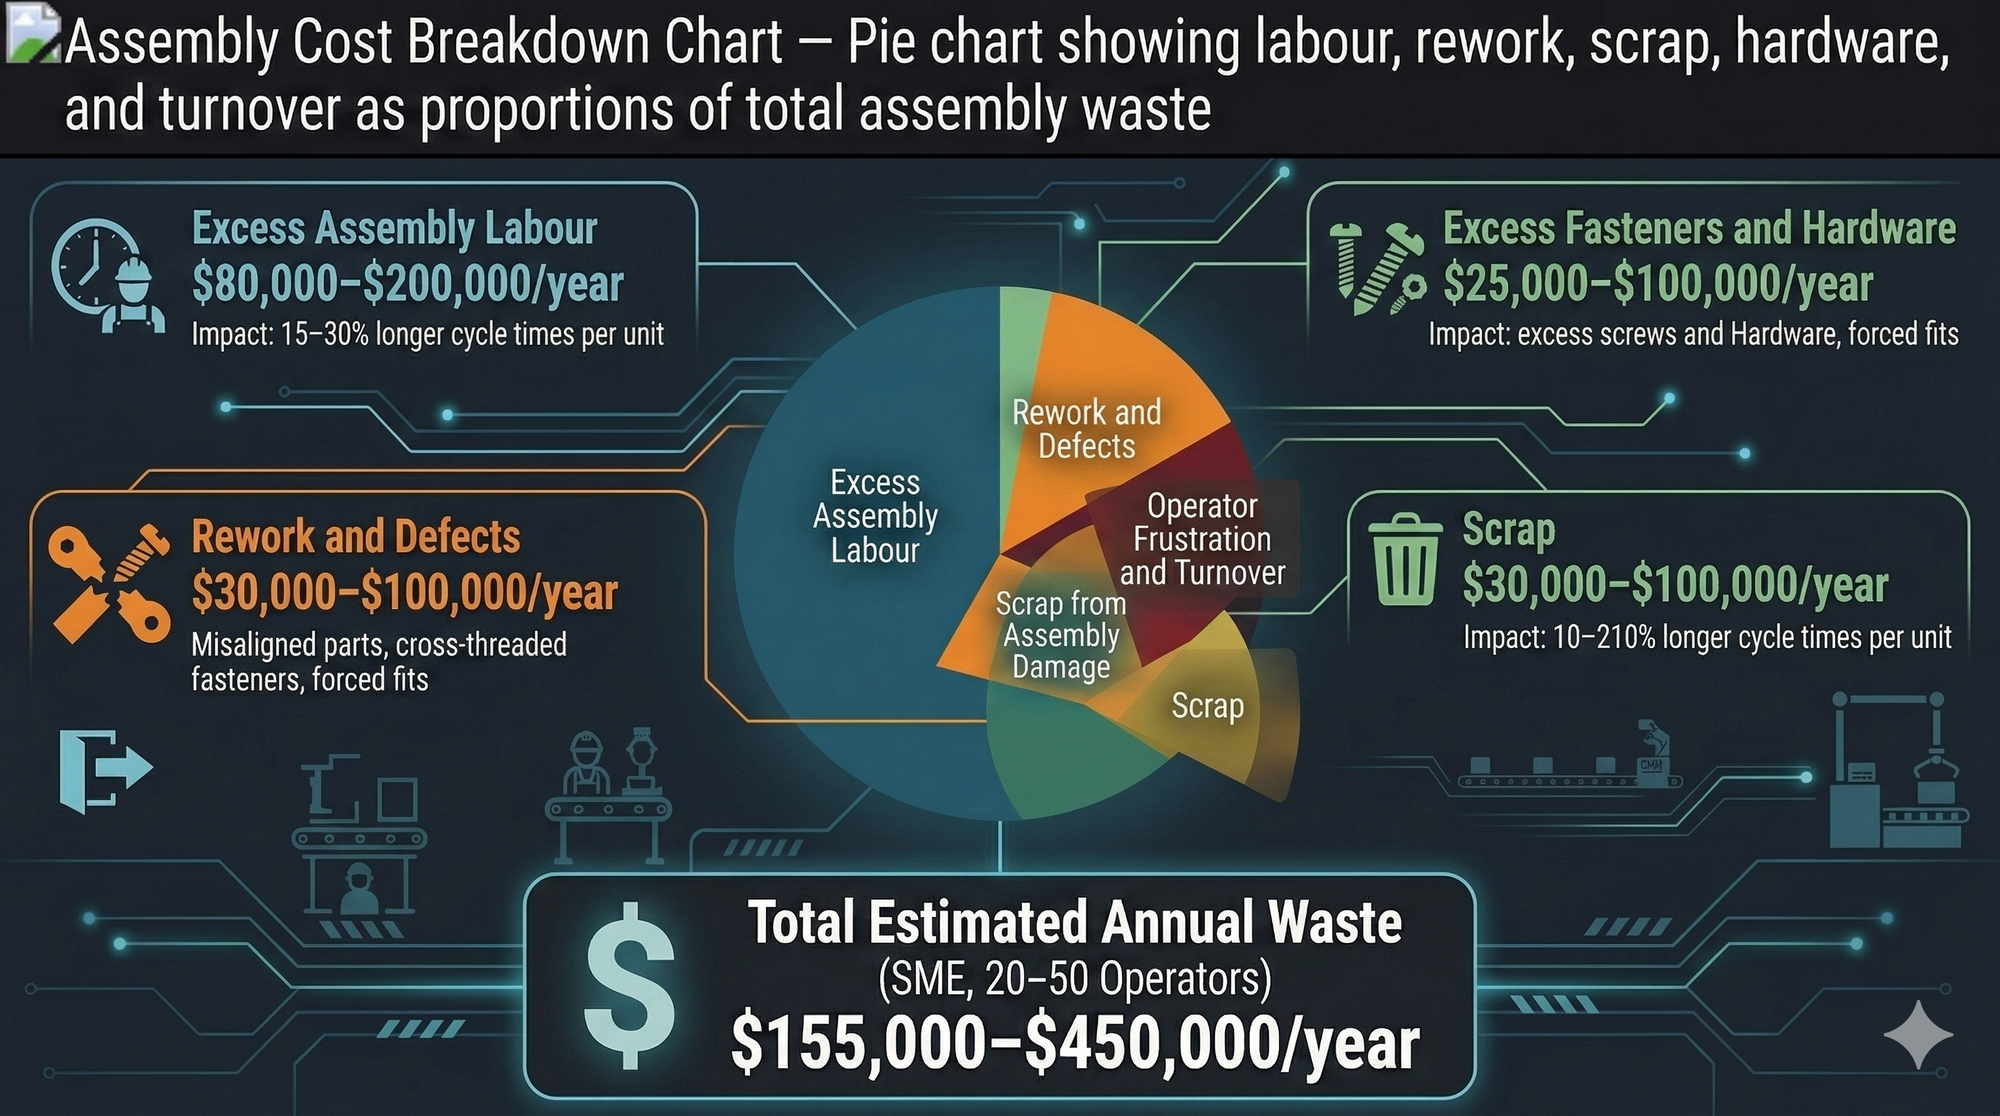
| Cost Category | Impact of Poor Assembly Design | Typical Annual Cost (SME, 20–50 Operators) |
|---|---|---|
| Excess assembly labour | 15–30% longer cycle times per unit | $80,000–$200,000/year |
| Rework and defects | Misaligned parts, cross-threaded fasteners, forced fits | $30,000–$100,000/year |
| Operator frustration and turnover | Higher error rates from fatigued or confused workers | $20,000–$60,000/year |
| Scrap from assembly damage | Parts damaged during difficult insertion or alignment | $15,000–$50,000/year |
| Excess fasteners and hardware | Over-designed joints requiring unnecessary screws, clips, or brackets | $10,000–$40,000/year |
| Total estimated waste | $155,000–$450,000/year |
That's cash walking out the door — not because of material prices or machine breakdowns, but because of decisions made at the design stage.
The Root Cause: Five Design Sins That Kill Assembly Efficiency
Over 25 years in engineering and production, I've identified five recurring design mistakes that drive up assembly cost. Most manufacturers are guilty of at least three.
1. Too Many Parts
Every additional part in an assembly is a part that needs to be purchased, stored, handled, oriented, positioned, and fastened. Each part adds cost — not just material cost, but handling cost.
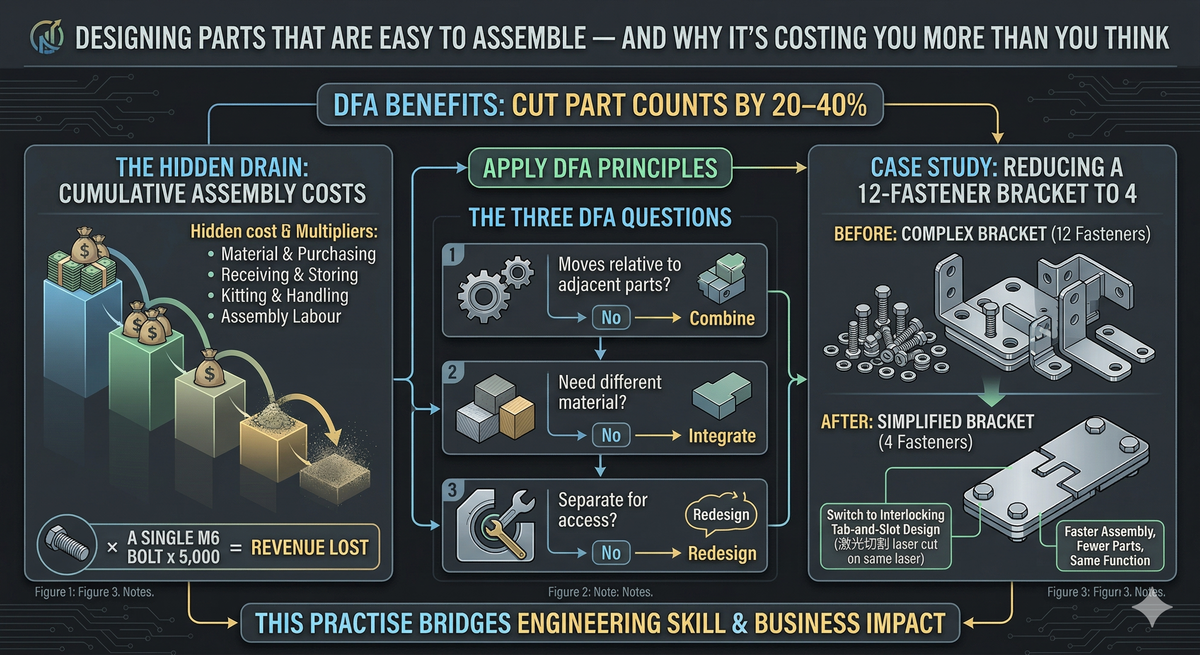
The Boothroyd-Dewhurst DFMA method — the gold standard for assembly analysis — asks three questions of every part:
- Does it move relative to the rest of the assembly?
- Does it need to be a different material?
- Does it need to be separate for assembly or disassembly access?
If the answer to all three is "no," the part is a candidate for elimination or consolidation. In practice, I've seen part counts reduced by 30–50% on assemblies that were never reviewed with these questions in mind.
2. Parts That Can Be Assembled Wrong
If a part can be inserted backwards, upside down, or rotated 180°, it will be — eventually. This is a fundamental principle of error-proofing (poka-yoke). Every orientation ambiguity is a defect waiting to happen.
The fix is simple in principle: design parts with asymmetric features so they can only go together one way. Add locating tabs, chamfers, or keyed slots. Use colour-coding on sub-assemblies. Make it physically impossible to assemble the part incorrectly.
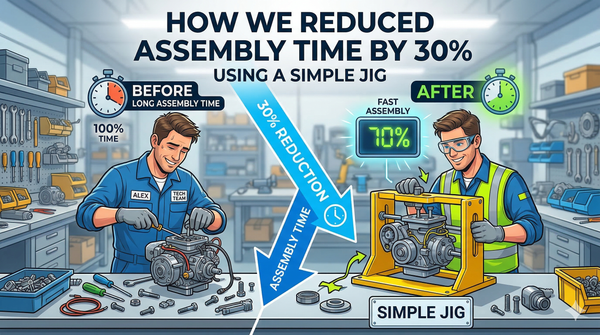
On the one production line I designed and commissioned in Sydney, error-proofing was built directly into the jigs and fixtures. The result was a low-error workflow that reduced operator dependency and rework from day one — all delivered for under $50,000.
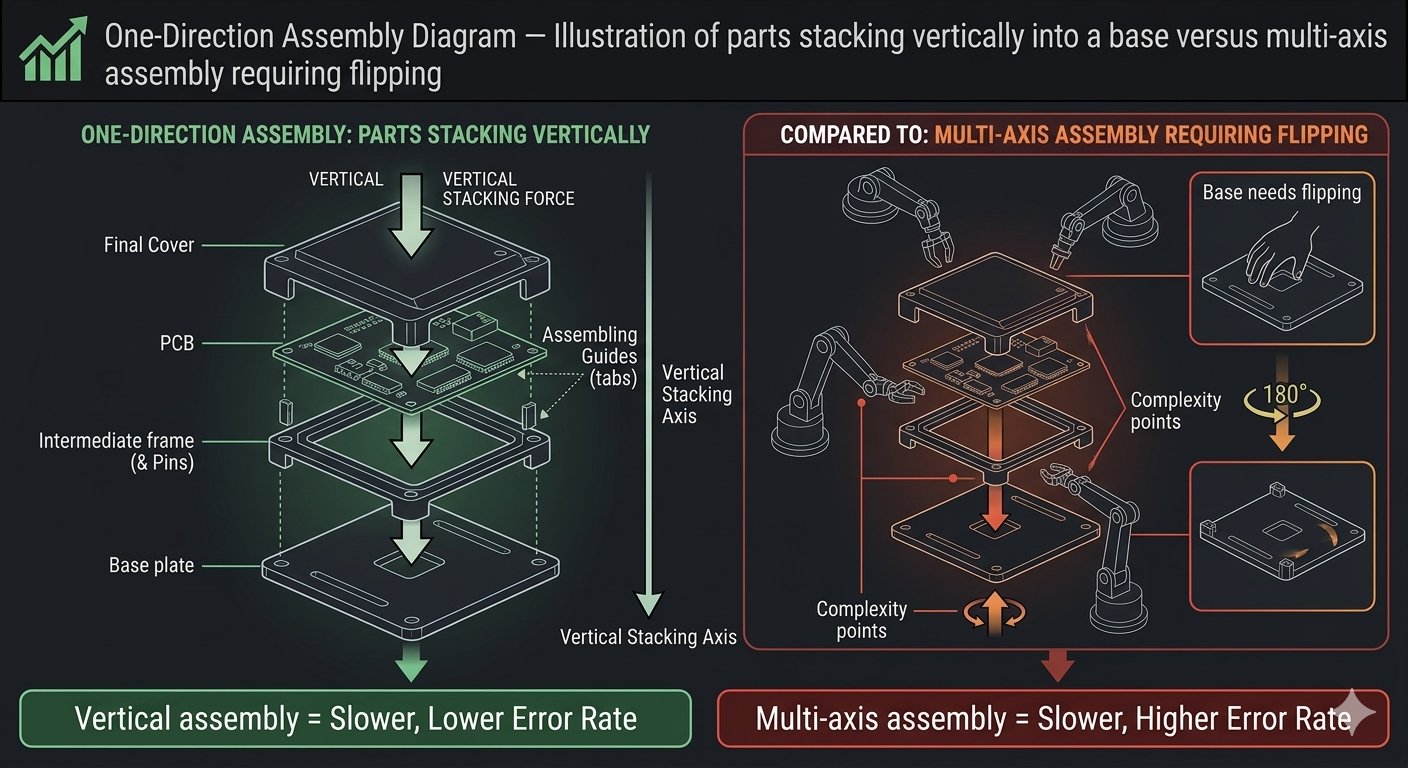
3. Parts That Need Reorientation During Assembly
Every time an operator has to flip, rotate, or reposition a part or the assembly itself, you're adding non-value-added time. The ideal assembly sequence flows in one direction — typically top-down — with parts stacking or inserting from a single axis.
When I map assembly workflows using time studies and line balancing, reorientation is one of the first things I look for. It's wasted motion that adds seconds per unit, and those seconds compound over thousands of units per year.
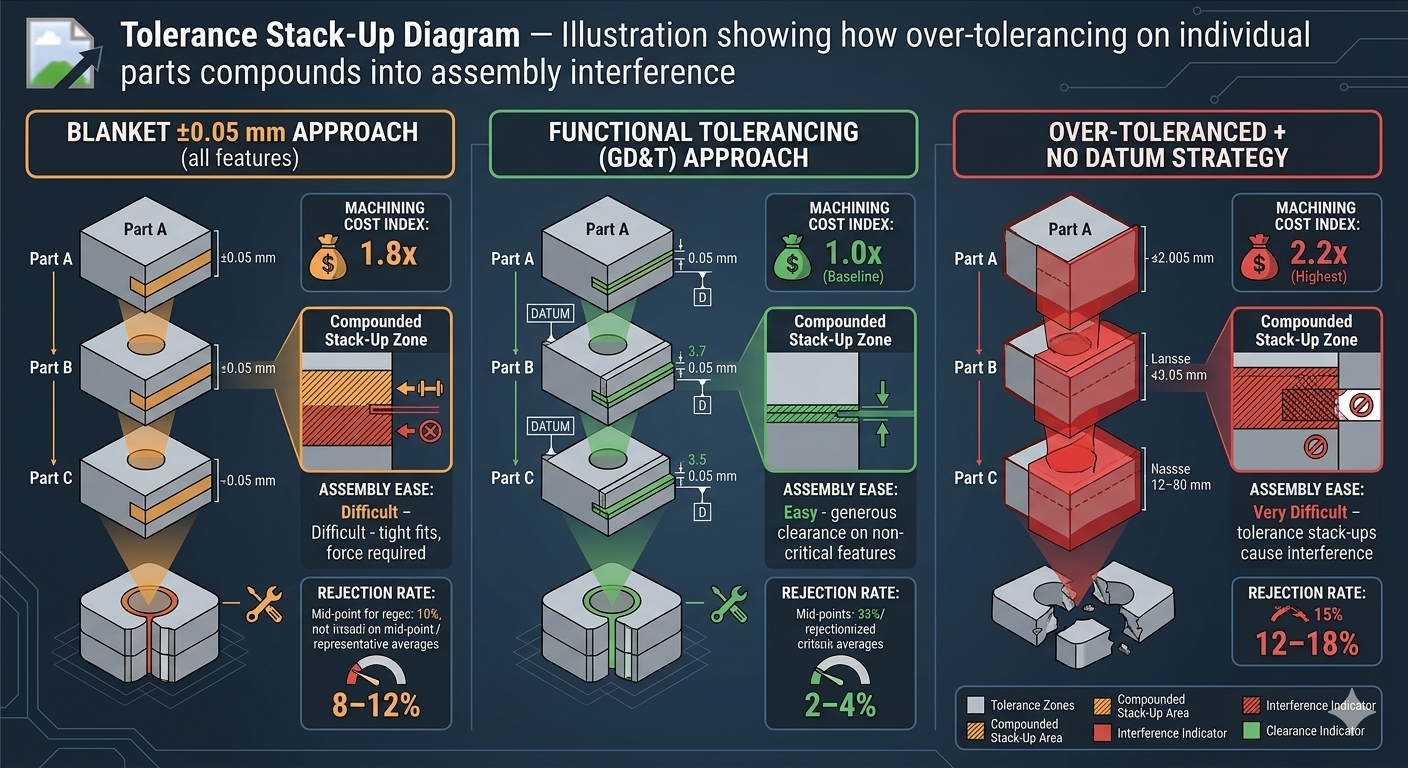
4. Tight Tolerances Where They're Not Needed
Over-tolerancing is one of the most expensive habits in engineering design. A tolerance of ±0.05 mm on a non-critical feature doesn't just increase machining cost — it increases assembly difficulty because the parts are harder to fit together and more likely to be rejected at inspection.
The rule of thumb: specify the loosest tolerance that still meets the functional requirement. Use GD&T (Geometric Dimensioning and Tolerancing) properly to communicate what actually matters — position, flatness, perpendicularity — rather than blanket tight tolerances on every dimension.
| Tolerance Approach | Machining Cost Index | Assembly Ease | Rejection Rate |
|---|---|---|---|
| Blanket ±0.05 mm on all features | 1.8x baseline | Difficult — tight fits, force required | 8–12% |
| Functional tolerancing (GD&T) | 1.0x baseline | Easy — generous clearance on non-critical features | 2–4% |
| Over-toleranced + no datum strategy | 2.2x baseline | Very difficult — tolerance stack-ups cause interference | 12–18% |
5. Excess Fasteners
Screws, bolts, rivets, clips — every fastener is an assembly operation. Each one requires a tool, a torque spec, and time. I've reviewed products where a single sub-assembly used 14 different screw types across 28 fastening points. That's 28 opportunities for error, 28 pick-and-place operations, and a parts bin that looks like a hardware store.
The fix: reduce fastener count, standardise fastener types across the product, and explore snap-fits, press-fits, or adhesive bonding where appropriate. Every fastener you eliminate is cycle time recovered.
The Solution: A Practical DFMA Framework for SMEs
You don't need expensive software or a dedicated DFMA team to start improving assembly efficiency. Here's a practical framework I use with manufacturing clients.
Step 1 — Conduct an Assembly Audit
Before you redesign anything, understand what's actually happening on the floor. Time the assembly process. Count the parts. Document every reorientation, every tool change, every point where the operator hesitates or reaches for a workaround.
Use a simple table:
| Assembly Step | Part(s) Involved | Tool Required | Time (sec) | Reorientation? | Error Risk (H/M/L) |
|---|---|---|---|---|---|
| 1. Position base plate | Base plate | None (hand) | 5 | No | L |
| 2. Insert side bracket | Side bracket | Allen key | 18 | Yes — flip assembly | M |
| 3. Fasten bracket (x4 screws) | M5 screws (x4) | Electric driver | 32 | No | M |
| 4. Attach cover | Cover plate | Phillips driver | 22 | Yes — rotate 90° | H |
| ... | ... | ... | ... | ... | ... |
This data tells you exactly where the time and risk are concentrated.
Step 2 — Challenge Every Part
Go through the assembly BOM and apply the three-question test to every component:
- Does it move relative to adjacent parts during operation?
- Must it be a different material from adjacent parts?
- Must it be separate for assembly or service access?
If the answer to all three is "no," mark it for consolidation. In many cases, two or three sheet metal parts can be replaced with a single bent or formed part. Two machined components can become one. A bracket and its mounting plate can be integrated.
Step 3 — Design for One-Direction Assembly
Redesign the assembly sequence so that all parts insert from a single direction — ideally top-down, using gravity to assist. This eliminates reorientation, reduces fixture complexity, and makes the process easier to automate later.
Step 4 — Error-Proof the Design
For every remaining part, ask: can this be assembled incorrectly? If yes, add asymmetric features, locating pins, chamfered lead-ins, or keyed geometry so that incorrect assembly is physically impossible.
This is poka-yoke at the design level — the most powerful form of mistake-proofing because it eliminates the error before it reaches the production floor. Categories of error-proofing to consider:
| Poka-Yoke Method | Example | Cost to Implement |
|---|---|---|
| Asymmetric geometry | Tab on one side prevents 180° rotation | Nil — design change only |
| Chamfered lead-ins | Tapered edges guide part into position | Nil — design change only |
| Colour-coding | Sub-assemblies marked by colour for orientation | Low — paint or anodise |
| Keyed or D-shaped features | Shaft or hole shaped to prevent wrong orientation | Nil — design change only |
| Locating pins in jigs/fixtures | Fixture only accepts part in correct position | Low–Medium — tooling cost |
Step 5 — Standardise Fasteners
Audit every fastener in the product. Reduce the number of unique types to the absolute minimum. Ideally, a product should use no more than two or three fastener types. This reduces tool changes, simplifies the parts bin, cuts purchasing complexity, and speeds up training for new operators.
Step 6 — Validate with a Build Trial
Before locking in the new design, build a prototype assembly with production operators — not engineers. Watch where they hesitate. Listen to their feedback. Time the process. Compare it to the baseline data from Step 1.
If the new design reduces assembly time by 20–40% and eliminates the major error risks, you've got a winner. Lock it in, update the ERP BOMs and routing, and roll it out.
The Financial Payoff
Let's model the impact of a DFMA review on a typical SME product.
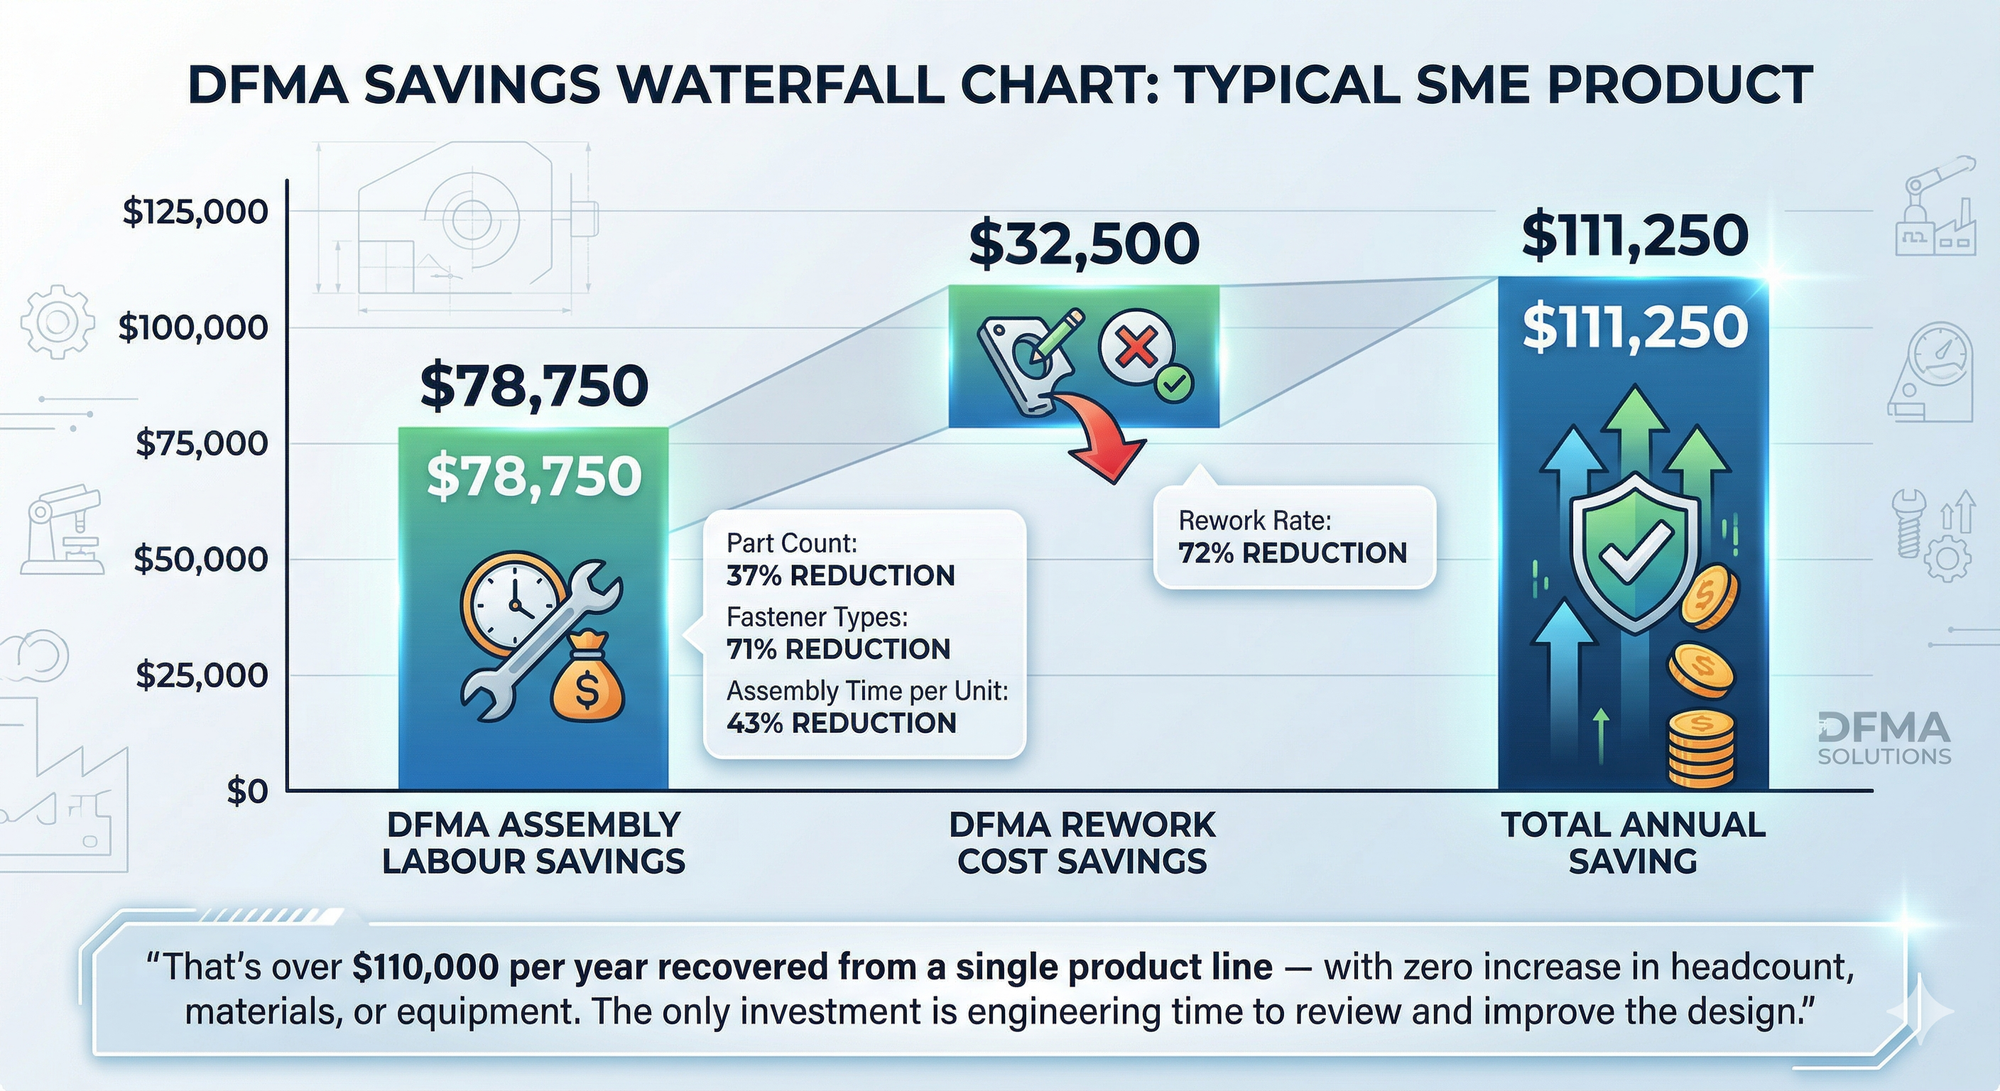
| Metric | Before DFMA | After DFMA | Improvement |
|---|---|---|---|
| Part count | 38 | 24 | 37% reduction |
| Fastener types | 7 | 2 | 71% reduction |
| Assembly time per unit | 14.5 min | 8.2 min | 43% reduction |
| Rework rate | 9% | 2.5% | 72% reduction |
| Assembly labour cost/year (5,000 units) | $181,250 | $102,500 | $78,750 saved |
| Rework cost/year | $45,000 | $12,500 | $32,500 saved |
| Total annual saving | $111,250 |
That's over $110,000 per year recovered from a single product line — with zero increase in headcount, materials, or equipment. The only investment is engineering time to review and improve the design.
Takeaway
The cheapest way to cut assembly cost is not faster workers or better tools — it's better design. Every unnecessary part, every ambiguous orientation, every excess fastener is money you're spending on the factory floor that should never have left the design office. DFMA isn't just an engineering exercise. It's a business strategy that directly improves your bottom line and your cash flow.
Ready to Find the Assembly Cost Hidden in Your Designs?
If you want help identifying where your product designs are costing you money on the assembly floor, I offer a short CostDown Audit to uncover hidden savings — from part count reduction and tolerance review to error-proofing and fastener rationalisation. It's practical, hands-on, and focused on financial impact.