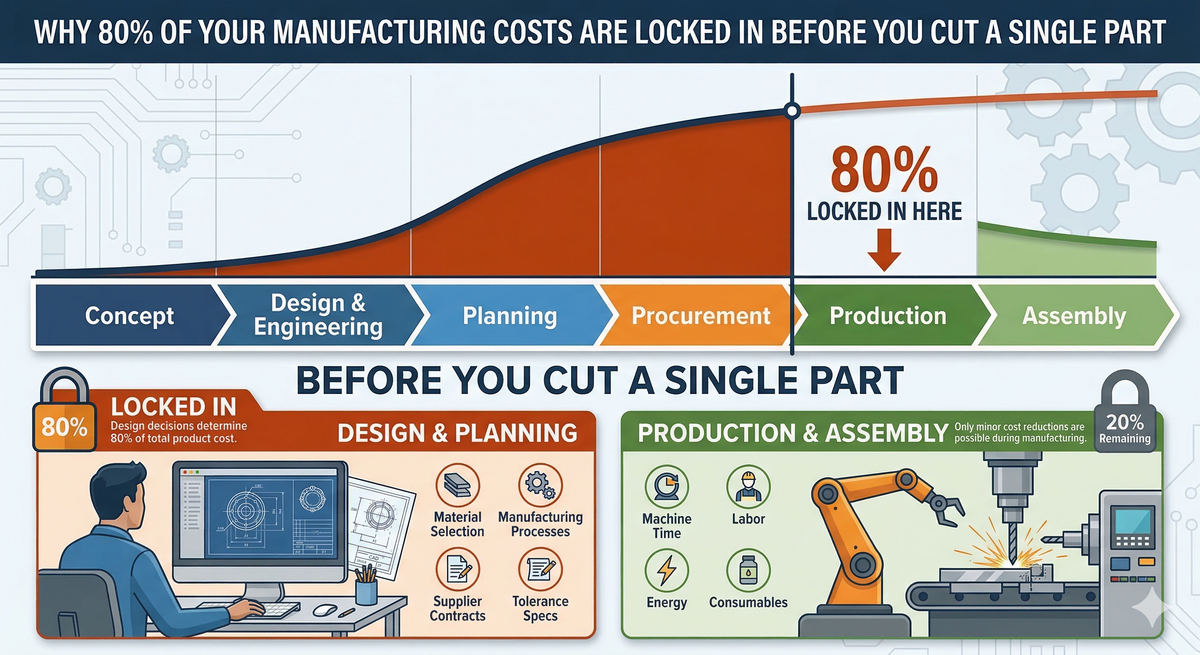
Why 80% of Your Manufacturing Costs Are Locked In Before You Cut a Single Part
Most manufacturers focus on cutting costs on the shop floor — materials, cycle times, and labour. But the reality is ~80% of costs are locked in during design, long before production. This post shows how design decisions drive those costs — and how to take control of them.

The Problem: You're Fighting the Wrong Battle
Walk into most small and mid-sized manufacturing operations in Australia and ask the owner where costs are out of control. You'll hear the usual suspects: material prices, wages, energy bills, machine downtime.
These are real costs. But they're not the root cause of most cost problems.
The root cause sits further upstream — in the design office, in the CAD model, in decisions that were made months or years ago and have been baked into every production run since. Wall thickness. Feature complexity. Tolerance specifications. Gate locations on injection-moulded parts. Rib geometry. Assembly method.
These decisions don't just influence cost. They determine it.
I've seen this pattern repeat across 25 years of engineering and operations work — from toolmaking through to production line commissioning. The most expensive problems on the shop floor almost always trace back to a design decision that nobody questioned.
Where Design Locks In Cost
Let me walk through the specific mechanisms. These aren't abstract theories — they're the engineering realities I deal with every day.
1. Wall Thickness Drives Cycle Time (and Cycle Time Drives Cost)
In injection moulding, cooling accounts for approximately 70% of total cycle time. And cooling time doesn't increase linearly with wall thickness — it increases with the square of wall thickness.
That means if a designer specifies a 4mm wall where 2mm would do the job, you haven't doubled your cycle time. You've quadrupled it.
| Wall Thickness | Relative Cooling Time | Cycle Time Impact |
|---|---|---|
| 2.0 mm (baseline) | 1× | Baseline |
| 3.0 mm | 2.25× | +125% longer cooling |
| 4.0 mm | 4× | +300% longer cooling |
| 5.0 mm | 6.25× | +525% longer cooling |
Every extra second of cycle time costs you money on every single part, every single run, for the entire life of that product. On a mould running 500,000 parts per year, an unnecessary 2mm of wall thickness can translate to tens of thousands of dollars in lost throughput — every year.
That cost was decided at the design stage. It cannot be recovered on the shop floor.
2. Feature Complexity Multiplies Everywhere
Every feature a designer adds to a part creates downstream cost. Fillets, chamfers, bosses, ribs, text, threads — each one adds:
- Machining time on the tool or mould
- Surface area that must be finished and maintained
- Rebuild time in the CAD model (slowing engineering changes)
- Inspection complexity for quality control
Here's one that catches people off guard: modelling helical threads instead of using a cosmetic or simplified representation generates roughly five times the surface geometry. That's five times the data your CNC program has to process, five times the rendering load, and significantly more machining time on the mould tool — all for a feature that could have been tapped in a secondary operation or represented cosmetically.
The same principle applies to embossed or engraved text. TrueType fonts can generate hundreds of geometric entities per character. If that text is moulded or machined, every letter adds tool complexity and cycle time.
The design rule is simple: if a feature doesn't serve a functional or critical aesthetic purpose, it shouldn't be there.
3. Gate Location Determines Defect Rate
In injection moulding, the point where plastic enters the cavity — the gate location — affects virtually everything downstream:
- Fill balance — an off-centre gate means one side fills before the other, creating uneven packing and warpage
- Injection pressure — a gate at the end of a long flow path demands significantly higher pressure than a centrally placed gate
- Weld lines — where melt fronts converge, you get mechanically weak zones and visible surface defects
- Air traps — incorrectly positioned gates can trap air pockets, causing burn marks or incomplete fills (short shots)
A gate in the wrong location creates defects that show up as scrap, rework, customer complaints, and warranty claims — cycle after cycle after cycle. Moving the gate is a tooling change that costs thousands. But the decision that put it in the wrong place was made in the design phase, often without consulting manufacturing.
4. Rib and Boss Geometry Creates (or Prevents) Sink Marks
Plastics are poor thermal conductors. Thick sections cool slowly, shrink more, and pull the surface inward — creating sink marks. This is pure physics, and no amount of process tweaking can fully overcome a bad design.
The design rule is well established: ribs and bosses should be 60–80% of the nominal wall thickness. Exceed that, and you're designing sink marks into every part.
| Rib-to-Wall Ratio | Sink Mark Risk | Rework/Scrap Impact |
|---|---|---|
| 50–60% | Low | Minimal |
| 60–80% | Acceptable | Manageable with packing |
| 80–100% | High | Frequent rejects |
| >100% | Very High | Chronic quality problem |
When I see a production line rejecting parts for cosmetic defects, the first place I look isn't the process settings — it's the part geometry. Nine times out of ten, the problem was designed in.
5. Tolerance Specifications Price You In or Price You Out
Every tolerance on a drawing has a cost attached to it. Tighter tolerances demand better tooling, more precise machines, slower feeds, more inspection, and higher rejection rates.
The problem in most SMEs isn't that tolerances are specified incorrectly — it's that they're specified without thinking about cost. A designer who defaults to ±0.05mm on every dimension when ±0.2mm would function perfectly is adding cost to every part with no functional benefit.
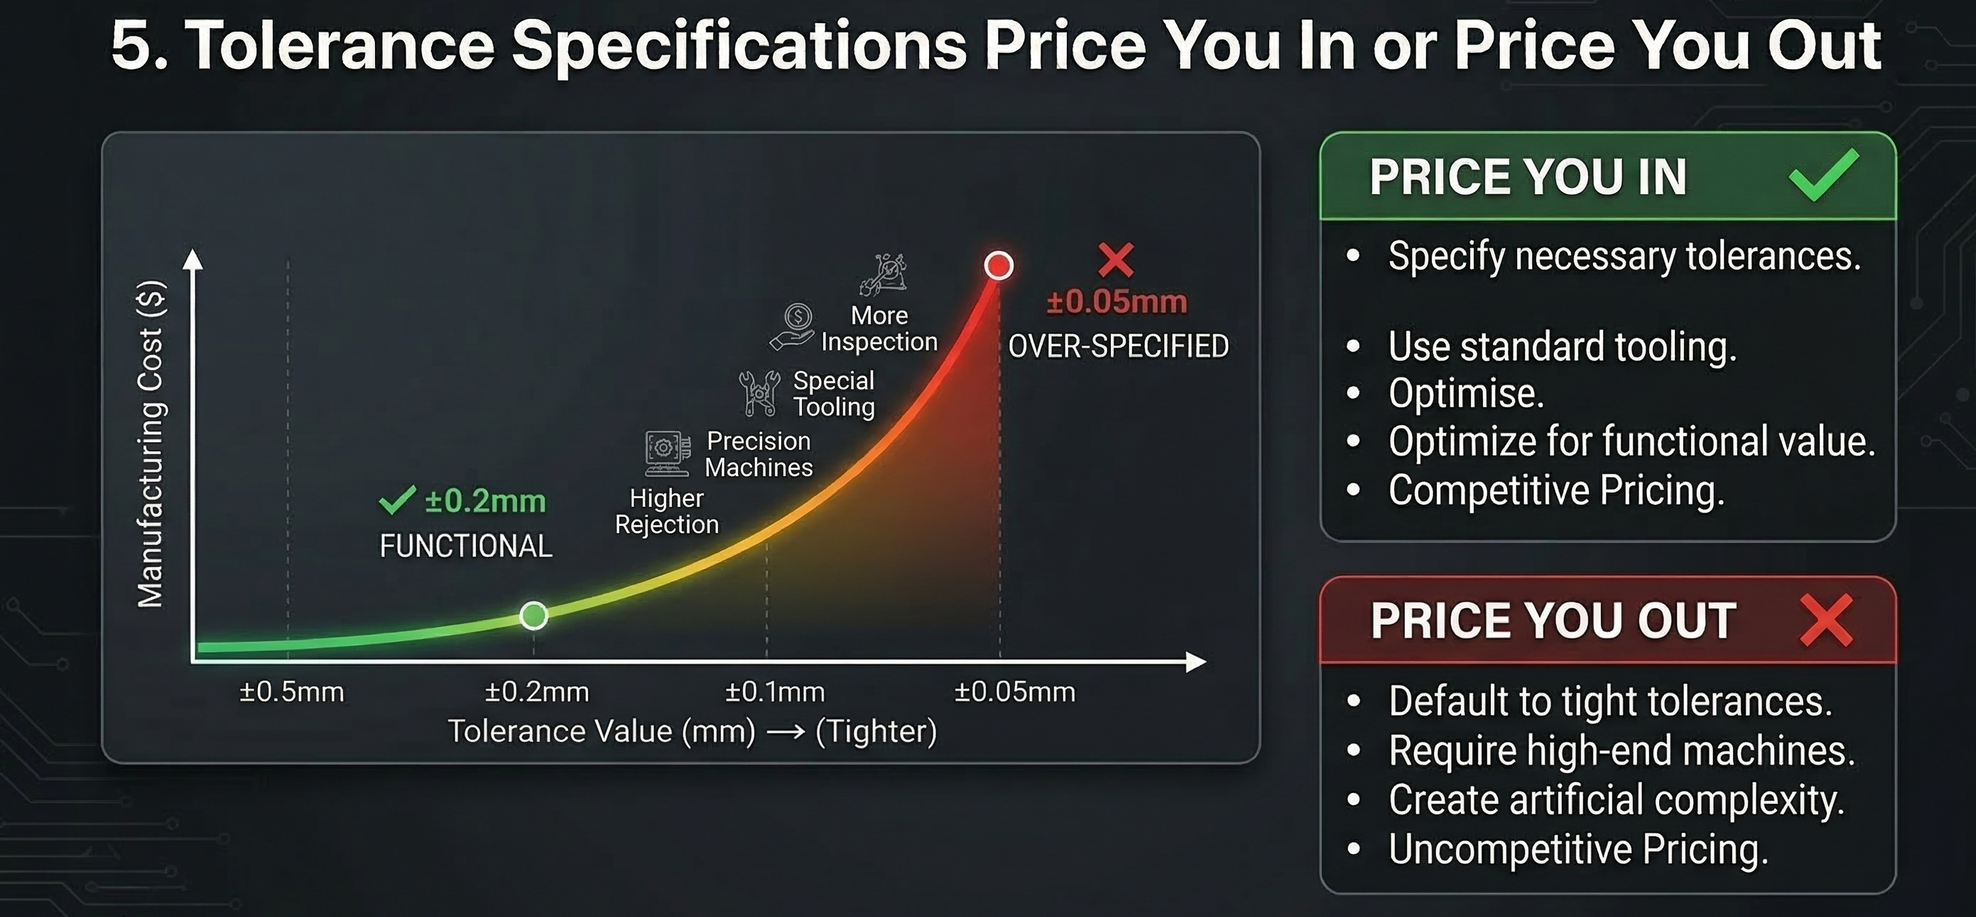
Tighter tolerances don't increase cost linearly — they increase it exponentially. Every unnecessary decimal place costs real money.
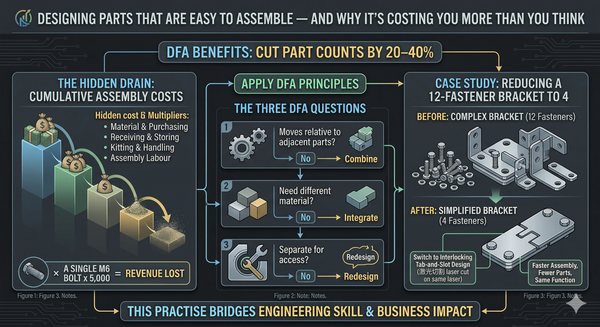
6. Assembly Method Is a Design Decision
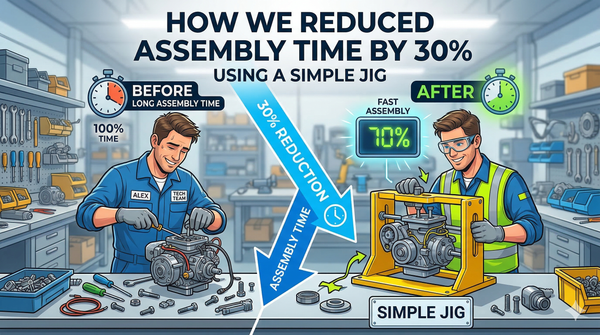
How a product goes together — the number of fasteners, the order of assembly, the access required for tools, the need for fixtures — is determined by the designer. A product that requires 12 screws, a fixture, and a skilled assembler where a snap-fit and two self-locating features would do the same job is carrying unnecessary labour cost in every unit.
During the Louvre Line project, designing the workflow around takt time and building error-proofing directly into the fixtures meant that assembly complexity was addressed before the line was built — not after production had started and problems had surfaced. The result was a production line delivered for under $50,000 that reduced errors, rework, and operator dependency from day one.
That outcome was only possible because cost was treated as a design parameter, not a shop floor afterthought.
The Cost Commitment Curve
This is the concept every manufacturer needs to understand. As a product moves through its lifecycle — from concept to design to tooling to production — the ability to influence cost drops sharply while committed cost rises steeply.
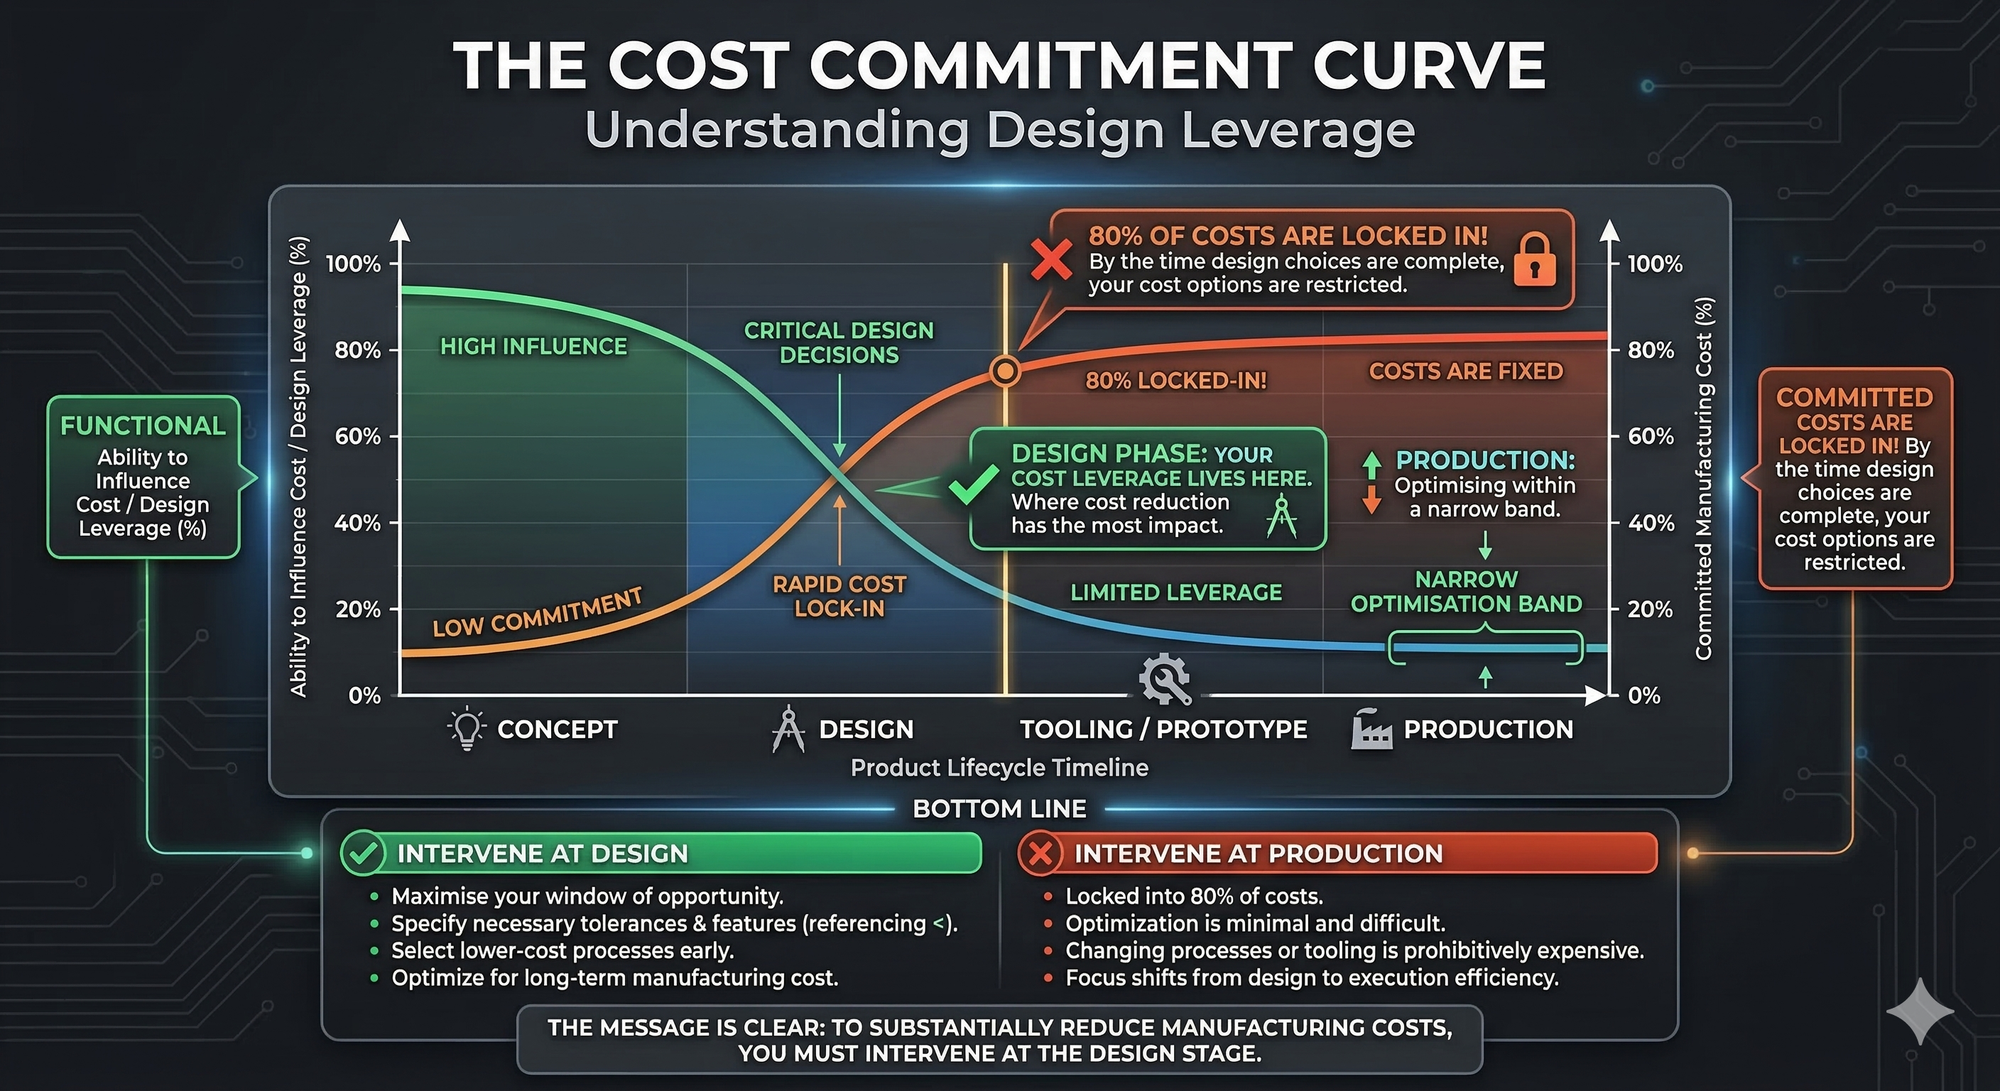
By the time you're in production, roughly 80% of your costs are already locked in. The design phase is where your cost leverage lives.
| Phase | Cost Influence | Cost Committed |
|---|---|---|
| Concept / Planning | Very High | ~5% |
| Detailed Design | High | ~70–80% |
| Tooling / Process Setup | Moderate | ~90% |
| Production | Low | ~95–100% |
| Post-Production (Rework) | Very Low | 100%+ (adding cost) |
The message is clear: if you want to reduce manufacturing costs, you need to intervene at the design stage. By the time parts are running, you're optimising within a narrow band.
What to Do About It
1. Embed Manufacturing Knowledge in the Design Process
The single most effective intervention is getting manufacturing experience into the design office — not after the design is finished, but while decisions are still being made.
This doesn't require hiring a full-time manufacturing engineer. It means having someone who understands tooling, cycle times, material behaviour, and assembly methods review designs before they're released for tooling.
2. Run Simulation Before Cutting Steel
Mould flow analysis, FEA, and tolerance stack-up studies cost a fraction of a tooling modification. A fill analysis will show you air traps, weld lines, pressure problems, and cooling imbalances before a single dollar is spent on steel. The defect cause-and-effect relationships are well understood:
| Defect | Root Cause (Design) | Cost if Not Caught |
|---|---|---|
| Short shots | Excessive flow length, thin walls | Scrap + downtime |
| Sink marks | Thick ribs/bosses (>80% of wall) | Rejects + rework |
| Warpage | Non-uniform wall thickness | Assembly failures |
| Weld lines in load paths | Poor gate location | Field failures + warranty |
| Excessive cycle time | Over-specified wall thickness | Lost throughput — permanently |
3. Establish Design-for-Manufacturing Rules
Create a simple, enforceable set of rules your design team follows. These don't need to be complex:
- Uniform wall thickness wherever possible
- Ribs and bosses at 60–80% of nominal wall
- No helical thread models unless functionally required
- No embossed text unless customer-specified
- Tolerances justified by function, not habit
- Gate location reviewed with tooling/moulding input
- Assembly method reviewed for fastener count and fixture requirements
4. Review Legacy Products
Most manufacturers have products that have been in production for years with design-driven cost problems baked in. A structured review of your highest-volume or highest-cost products against these principles will almost always reveal savings opportunities.
I've seen legacy parts where a simple wall thickness change or rib redesign cut cycle time by 20–30% — savings that compound across hundreds of thousands of parts per year.
5. Treat Design Reviews as Financial Decisions
Every design review should include a cost lens. Not just "does it work?" but "does it work at the lowest possible cost?" When a design choice adds manufacturing complexity, someone should be asking: what does this decision cost us per part, per year?
Key Takeaway
The cheapest time to reduce manufacturing cost is during design — before tooling is ordered, before production starts, and before the cost structure becomes permanent. If your design process doesn't include manufacturing cost as a primary input, you're locking in costs that no amount of shop floor optimisation can recover.
Roughly 80% of your product's manufacturing cost is decided by the time the design is released. That's not a problem you can fix with faster machines or cheaper materials. It's a problem you fix with better design decisions.
Ready to Find the Costs Hiding in Your Designs?
If you suspect your products are carrying unnecessary manufacturing cost — from over-specified tolerances to cycle-time-killing wall thickness — I can help you find it.
I offer a short CostDown Design Audit that reviews your highest-cost products against proven design-for-manufacturing principles and identifies where design changes can deliver permanent cost reductions.