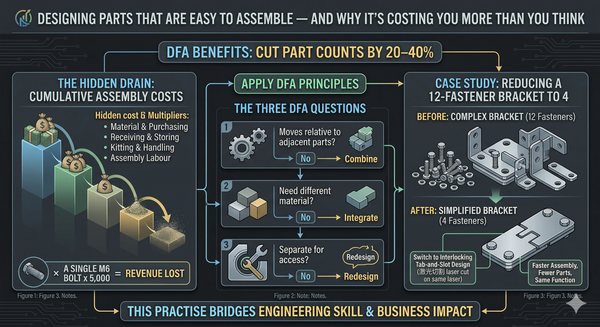
Why This Spring Design Causes Assembly Issues — And What It's Costing You
Poorly specified compression springs are a hidden cause of assembly issues. Binding, buckling, and inconsistent loads lead to stoppages, rework, and scrap. This post highlights 5 common design mistakes, their cost impact, and a practical checklist to prevent them.

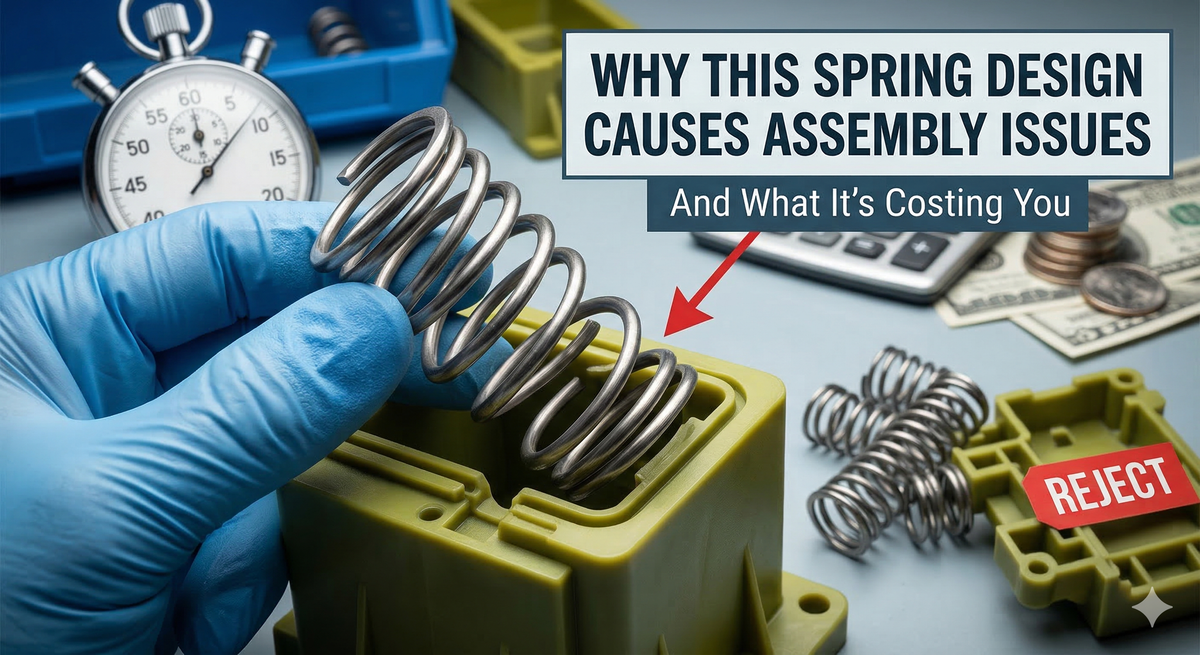
The Problem: Springs That Fight the Assembly
If you've spent any time on a manufacturing shop floor, you've seen it. An operator wrestling a spring into a housing. A jig that jams every third cycle. A batch of assemblies rejected because the spring load is inconsistent.
Springs are deceptively simple components. A bit of wire, coiled up, doing its job. But get the design wrong — even slightly — and you'll create a cascade of problems that ripple through your entire production line.
In my experience working across manufacturing operations — from toolmaking through to production line commissioning — I've seen spring-related assembly issues cause more hidden cost than most managers realise. It's rarely dramatic. It's death by a thousand paper cuts: a few extra seconds per assembly here, a rejected batch there, an operator who quietly compensates for a bad design every single shift.
The root cause is almost always the same: the spring was designed for function, not for assembly.
The Five Spring Design Errors That Kill Assembly Efficiency
1. No Clearance Allowance for OD Expansion
This is the one that catches people out most often.
When a compression spring is compressed, its outer diameter increases. The coils have to go somewhere — as pitch reduces, the wire redistributes outward. If the spring sits inside a bore or housing, and you've specified the OD to match the bore with minimal clearance, the spring will bind against the housing wall under load.
The expansion depends on pitch, wire diameter, and mean diameter. As a rule of thumb, you need to account for OD growth and ensure adequate clearance — typically at least 10% of OD for springs working inside a bore. This is particularly important on the high side of the OD tolerance band.
What it looks like on the line: Operators forcing springs into housings. Springs that compress unevenly. Intermittent jams. Scratching and wear marks inside bores.
What it costs: Every jam is a micro-stoppage. If each one adds 15 seconds to a 45-second cycle, you're losing 33% of your throughput on that station.
2. Slenderness Ratio Over 4 — The Buckling Problem
A compression spring with a free length more than four times its mean diameter will buckle under load — it bends sideways like a wobbly column instead of compressing straight.
This is basic mechanical design, but it gets missed constantly in product design, especially when designers are optimising for function (spring rate, load) without considering how the spring behaves during assembly.
The slenderness ratio is calculated as:
Slenderness Ratio = Free Length ÷ Mean Diameter
If the result is greater than 4, the spring is at significant risk of buckling. The fix is straightforward: shorten the free length, increase the OD, switch to a conical or barrel spring design, or guide the spring over a shaft or inside a tube.
What it looks like on the line: Springs that tip sideways when compressed. Operators using their fingers to keep springs centred. Inconsistent load delivery. Assembly rework.
What it costs: A buckling spring can't be reliably auto-fed or machine-assembled. You've just forced a manual intervention into every cycle.
3. Wrong End Type for the Application
Spring end types directly affect how the spring sits in its assembly — and whether it can be handled by automated feeders.
| End Type | Description | Assembly Impact |
|---|---|---|
| Open Ends | No closed coils at either end | Spring won't stand upright; tangles easily in bulk; poor load transfer |
| Closed & Squared | Last coil closed, touching adjacent coil | Stable base; stands upright; most economical |
| Closed & Ground | Closed ends ground flat | Best stability and squareness; higher cost due to grinding operation |
| Double Closed | Both ends fully closed | Good stability; suited to critical alignment applications |
Open-end springs are the most common culprit in assembly problems. They tangle in vibratory feeders, won't orient reliably in escapements, and don't sit flat in housings. If your spring needs to self-locate in an assembly, open ends are almost never the right choice.
What it looks like on the line: Bowl feeders jammed with tangled springs. Operators manually de-tangling and orienting springs. Misaligned springs causing downstream defects.
What it costs: One spring feeder jam every 10 minutes on a high-volume line can cost you 8–10% of daily output.
4. Spring Index Too Tight or Too Loose
The spring index is the ratio of mean diameter to wire diameter. It tells you how tightly wound the coils are — and whether the spring is actually manufacturable to consistent tolerances.
Spring Index = Mean Diameter ÷ Wire Diameter
| Spring Index | Condition | Impact |
|---|---|---|
| Below 4 | Too tight | Extremely difficult to manufacture; high stress; poor tolerance control |
| 4 to 12 | Ideal range | Consistent manufacturing; reliable performance |
| Above 15 | Too loose | Tangles easily; poor lateral stability; difficult to handle |
A spring with an index below 4 puts enormous stress on CNC coiling tooling, leading to inconsistent wire spacing, variable spring rates, and high scrap at the spring supplier — costs that get passed back to you. A spring with an index above 15 is floppy, tangles in bulk packaging, and resists automated handling.
What it looks like on the line: Variable spring rates across a batch. Inconsistent assembly torques or preloads. Incoming inspection rejections. Operator complaints about "good" and "bad" springs in the same box.
What it costs: Incoming inspection, supplier returns, and variable product quality. If your customer notices, you're looking at warranty claims and lost trust.
5. Solid Height Exceeds Available Space
Solid height is the length of the spring when fully compressed — all coils touching. If the solid height is greater than the available space in the assembly at maximum deflection, the spring will bottom out and either damage itself, damage the assembly, or prevent the mechanism from reaching full travel.
Solid height for closed and ground ends is calculated as:
Solid Height = Total Coils × Wire Diameter
For closed (unground) ends, add one wire diameter.
This is a tolerance stack-up problem as much as a design problem. You need to account for the spring manufacturer's tolerance on free length and coil count, plus the tolerance on your housing depth.
What it looks like on the line: Springs that "clunk" at end of travel. Mechanisms that don't fully close or engage. Fatigue failures from springs operating at or near solid height.
What it costs: Field failures, warranty returns, and potential safety issues. The most expensive kind of quality problem — the one your customer finds.
Cost / Impact Analysis
Let's quantify this for a typical Australian SME running a single assembly line.
| Issue | Frequency | Time Lost per Event | Annual Cost Impact (est.) |
|---|---|---|---|
| OD binding / jams | 20 per shift | 15 sec each | $18,000–$25,000 in lost throughput |
| Buckling — manual intervention | Every 3rd cycle | 8 sec each | $30,000–$45,000 in added labour |
| Feeder jams (wrong end type) | 6 per hour | 2 min each | $22,000–$35,000 in downtime |
| Variable spring rate — rework | 2–5% of batch | 3 min rework each | $15,000–$40,000 in rework + scrap |
| Solid height failures in field | 0.5–1% of shipped units | Warranty + reputation | $20,000–$100,000+ |
Total potential annual cost from spring design errors: $105,000 – $245,000+
For a component that costs $0.05 to $0.50 each, that's an extraordinary multiplier of downstream waste.
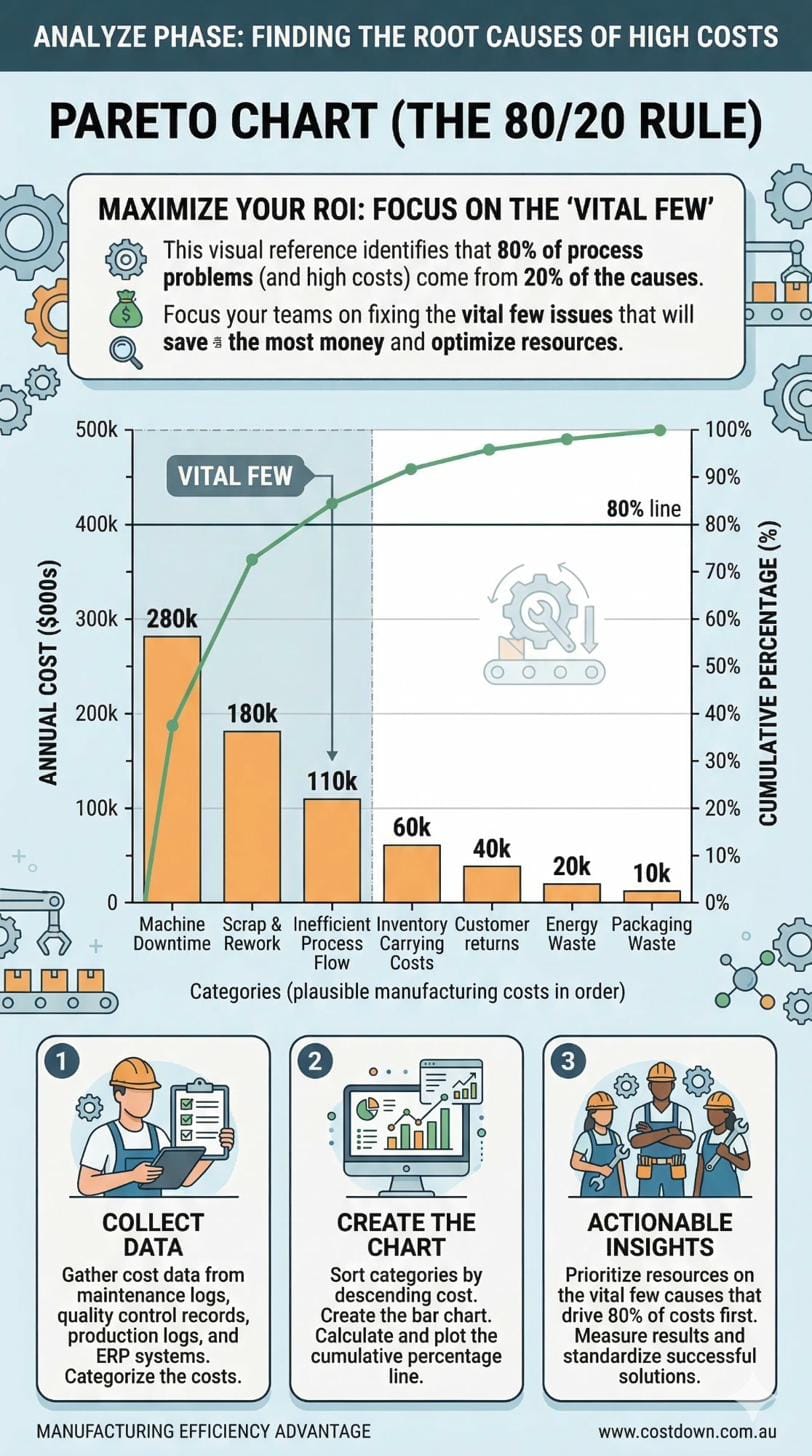
Suggested chart: Pareto chart showing relative cost contribution of each spring design error category.
Solution: The CostDown Spring Design-for-Assembly Checklist
Before any spring goes into production, run it through these seven checks. Print this out and tape it to the wall in your design office.
Step 1 — Define the Assembly Environment First
Before you set spring rate and load, answer these questions:
- Does the spring sit in a bore, over a shaft, or free-standing?
- What is the bore/shaft diameter and its tolerance?
- What is the maximum available length (installed and compressed)?
- Will the spring be auto-fed, hand-placed, or pre-assembled into a sub-component?
Step 2 — Check OD Expansion Against Housing Clearance
Calculate the expanded OD at maximum compression and verify you have at least 10% clearance inside the bore (or equivalent clearance over a shaft for ID). Always use the worst-case tolerance combination — maximum OD tolerance + maximum expansion.
Step 3 — Verify Slenderness Ratio Is Below 4
Calculate: Free Length ÷ Mean Diameter. If the result exceeds 4, redesign the spring geometry or add a guide (shaft or tube) to prevent buckling.
Step 4 — Specify the Right End Type for Your Assembly Method
- Manual assembly: Closed and squared (minimum)
- Automated/bowl-fed: Closed and ground (best feed reliability)
- Critical alignment: Double closed or closed and ground
Never specify open ends unless you have a specific engineering reason and have validated feed/handling.
Step 5 — Keep Spring Index Between 4 and 12
If your index falls outside this range, adjust wire diameter and/or outer diameter to bring it back. This ensures consistent manufacturing quality and reliable handling.
Step 6 — Verify Solid Height vs. Available Space
Calculate solid height and compare it to the minimum available cavity depth at full deflection. Include tolerance stack-up. Leave at least 10–15% clearance between solid height and maximum deflection to avoid bottoming out.
Step 7 — Prototype and Test in the Actual Assembly
Don't just test the spring on a bench. Test it in the assembly, on the line, with real operators. Watch for hesitation, awkward hand positions, and workarounds. If an operator has to fight the spring, the design is wrong.
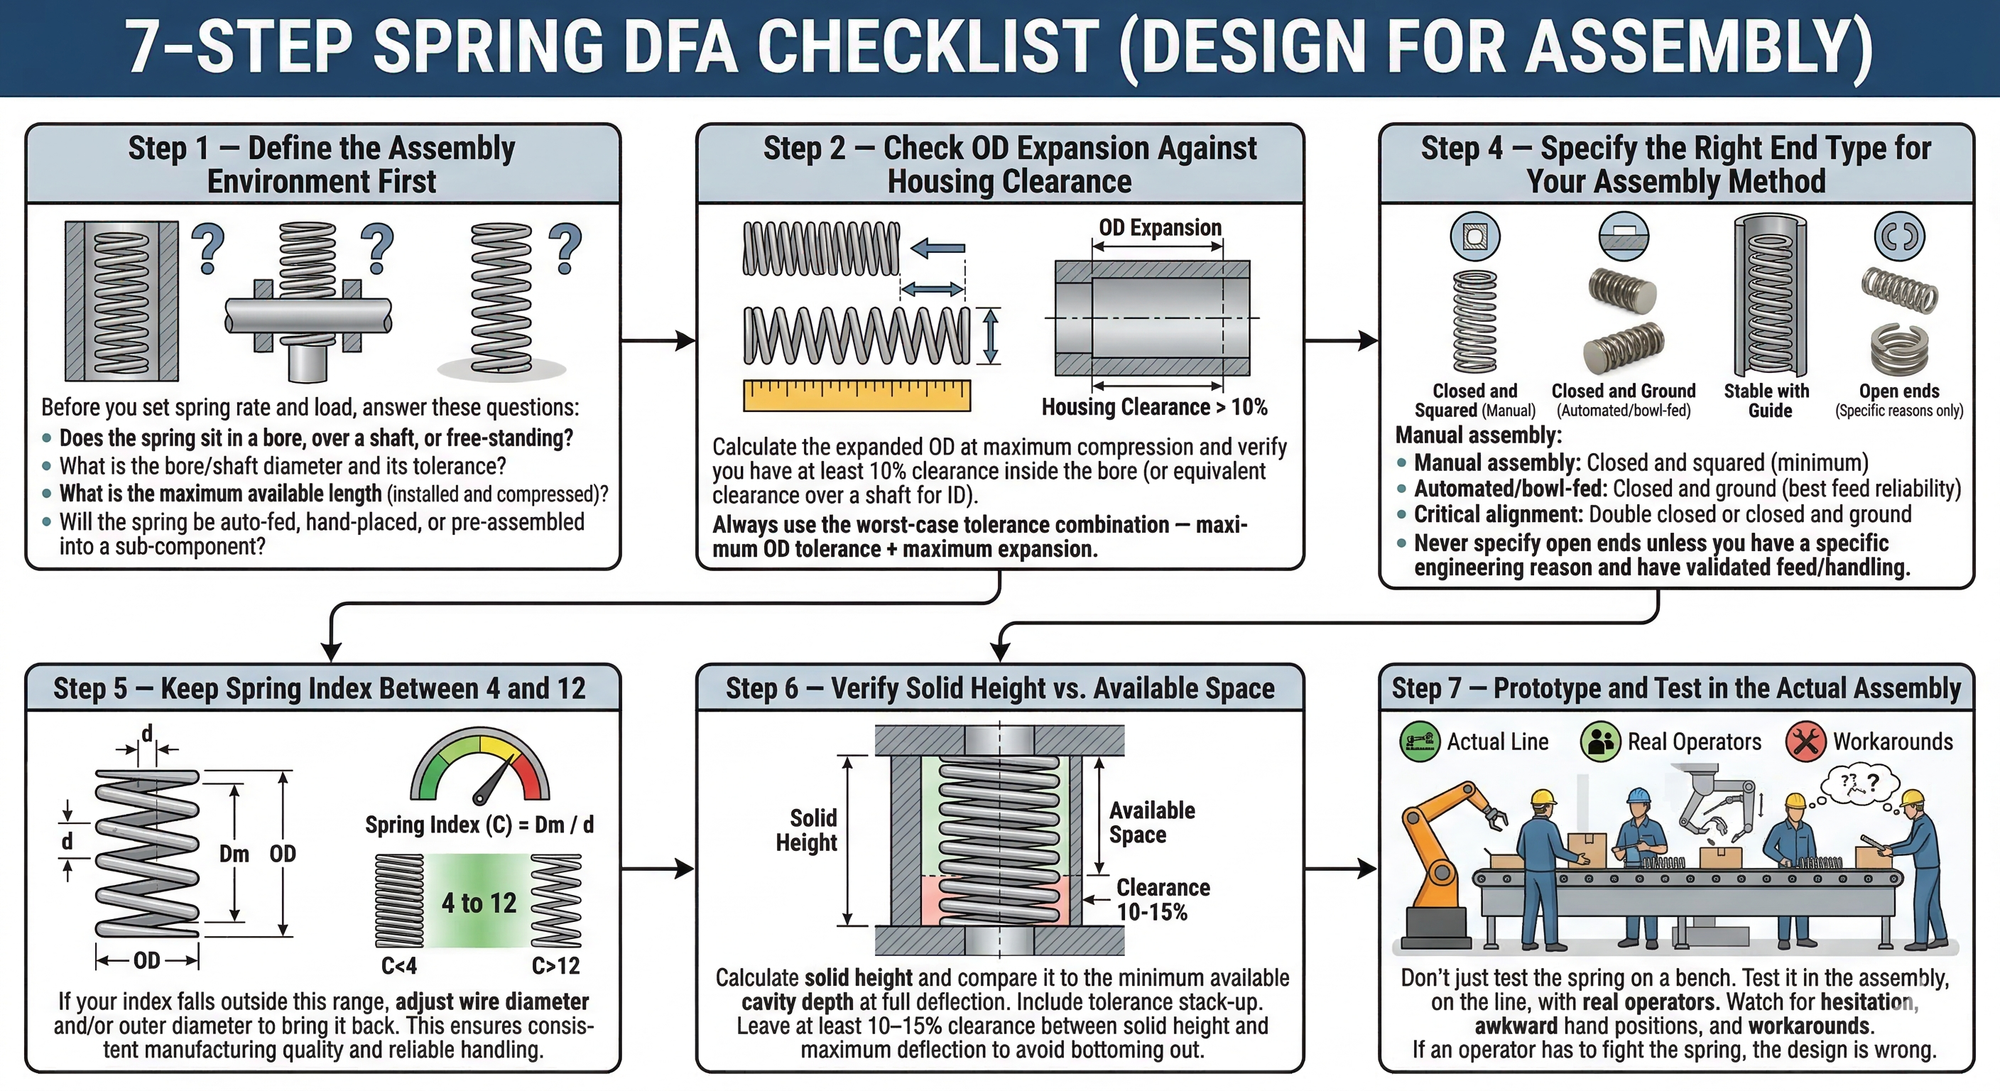
Suggested illustration: Flowchart of the 7-step spring DFA checklist.
The Design-for-Assembly Mindset
This is the lesson I keep coming back to after 25 years in engineering and manufacturing operations: the cheapest component on your BOM can be the most expensive problem on your line.
Spring design is a perfect example of what happens when design engineers optimise for function without thinking about assembly. The spring delivers the right load at the right deflection — on paper. But on the shop floor, it binds, buckles, tangles, or varies, and the cost of those problems is orders of magnitude greater than the cost of the spring itself.
The fix isn't complicated. It's a mindset shift — from "does it work?" to "can it be assembled reliably, quickly, and consistently?"
That's Design for Manufacture and Assembly (DFMA) thinking. And in my experience, it's where the biggest cost savings hide in most SME manufacturing businesses.
Key Takeaway
A compression spring costs cents. A bad spring design costs tens of thousands — in rework, scrap, downtime, and field failures. The five errors outlined here (OD expansion, buckling, wrong end type, poor spring index, solid height interference) are predictable, preventable, and quantifiable. Fix them at the design stage, not on the shop floor.
Ready to Find the Hidden Cost in Your Assemblies?
Spring design is just one example of how small design oversights create big production costs. If you suspect your line has similar issues — components that fight the assembly, operators working around bad designs, rework that nobody's tracking — I can help you find them.
I offer a short CostDown Audit to walk your shop floor, identify cost leaks, and give you a prioritised action plan with clear dollar values attached. No fluff. Just engineering insight focused on your bottom line.